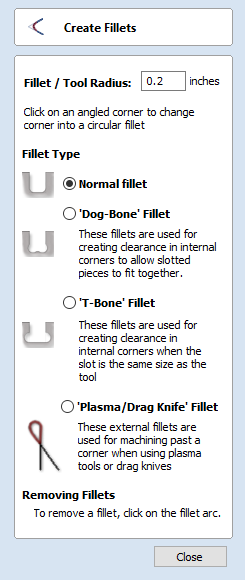
Create Fillets

Fillets or radiuses can be added interactively at points where any two spans on a contour meet. To use the filleting tool we select the icon from the drawing tab. Choose a radius for the fillet and the type of fillet you would like to use.
When the mouse cursor is near a node that can be filletted, the mouse cursor changes to show a check-mark ✓:


Not ready to fillet

Ready to fillet
When the check-mark ✓ is visible, click the left mouse button to fillet the corner.
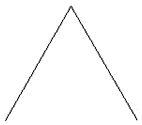
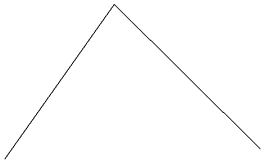
Angle Before Filletting
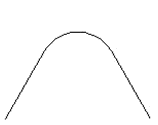
Angle After Filletting
As well as conventional radius filleting of corners, this tool includes 2 special types of filleting for corners formed by two straight lines. They will create an overcut shaped area in corners to allow clearance for another piece of material to be slotted into the part without being obstructed by material left by the radius of the tool. Below left you can see a blue piece of material fitted into a normally cut slot, this would fit no further in than the radius of the tool would allow. Below right you can see the same situation with a slot which has the Dog-Bone style corners applied to it which allows the part to fit full depth into the slot.

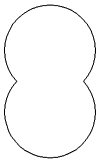
No Filleting

Accurate fit with Filleting
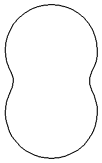
This is a very useful tool for slot-together furniture designs, model aircraft, dinosaurs etc. Below you can see a part from a slot together dinosaur assembly, on the left is the standard part and on the right is the same part with the T-Bone style fillets added to these slots. This type of fillet needs to be used when the slot is close in size to the tool diameter.
No Filleting

Slots Filleted
Fillet / Tool Radius
This size of this value is used to create the fillet as described for each individual type of fillet below. To create any of these Fillets you need to select the type required, then move the mouse cursor so it is over a corner between two vector spans. If it is a legitimate place to create the fillet then a check mark ✓ will show and the user can click the mouse button to create it. It should be noted that sometimes unexpected fillets will be created if the fillet size is too big for the vector shape. In that case, simply undo the change and repeat the process with a suitable fillet size.
Fillet Type
Normal fillet
This creates a standard corner fillet based on the Radius defined, typically this would be used for design purposes and not for editing a slot for fitting purposes. Below left the image shows the vector before filleting the two inside radii, on the right is the filleted version.
Straight Line Span Vectors before Filleting
Straight Line Span Vectors After Filleting
Normal filleting can also be used on Bezier and Arc Spans, or a combination of all three span types (Straight lines, Arcs, Beziers) if there is enough space to create a fillet based on the specified Radius.
Arc Span Vectors before Filleting
Arc Span Vectors after Filleting
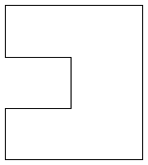
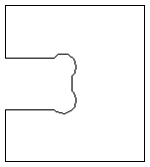
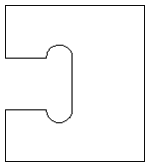
Dog-Bone Fillet
This creates a circular cut-out style of fillet, the circles will be placed so the upper right part of the circle touches the original sharp corner and are created with the Radius specified. This option should not be used if the slot width and the tool are similar in size. Below left is the vector showing the slot before filleting, on the right is the filleted version using the 'Dog-Bone' option.
Vectors before Dog-Bone Filleting
Vectors after Dog-Bone Filleting
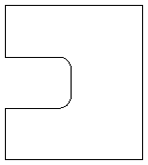
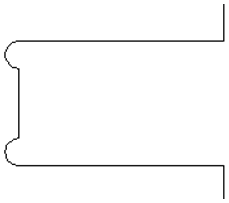
T-Bone Fillet
This creates a circular cut-out style of fillet, the circles will be created with the Radius specified. This option should be used if the slot width and the tool are similar in size so the slot can grow out to the side to ensure there is space for them to fit. Below left is the vector showing the slot before filleting, on the right is the filleted version using the 'T-Bone' option.
Vectors before T-Bone Filleting
Vectors after T-Bone Filleting
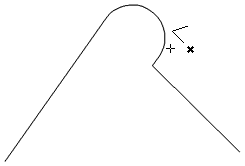
The placement of the fillet is an interactive process; you can choose which side of the 'corner' the T-bone filet is placed. If you click on a 'corner' the fillet will be placed automatically on the longest side. By clicking to the side of the corner you want the fillet placed you can choose which side the fillet is placed on.
vertical edge clicked
near the corner

Horizontal edges clicked
near the corner
In addition, fillet arcs can be removed by simply clicking on an existing fillet arc. This works even for vectors that have been imported with filleted corners. This feature allows the user to easily change the size of fillets by clicking once to remove the existing arc and then clicking the corner to insert the new fillet. In many cases, by allowing the user to control which side of the corner the 'T-Bone' fillet is placed on means that the fillet can be hidden when the pieces are assembled.
You cannot remove fillet arcs from .eps files as they do not contain arcs and only contain straight lines and Bezier Spans.
Removing Fillets
Fillets can be removed in the same way that we add fillets: move the cursor over the fillet that you wish to remove.
If this fillet can be removed then the cursor shows a cross to indicate that it is possible to remove a fillet:

Clicking removes the fillet:
Before removing fillet
After removing fillet
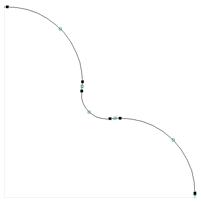
When removing fillets the software does not store what kind of geometry the fillet was created from. It always defaults to using straight lines to return the fillet to a sharp corner. As such if the fillet is across multiple spans or is derived from arcs or Bezier curves then it will not go back to its original state and instead it will remove the radius and extend two straight lines to create the new corner. Below are images that show this effect, the first set show the whole vector and the second show a section of the vector in node edit mode to help show the difference. If the fillet was created recently then it may be possible to use the Undo command to return it back to its original geometry.
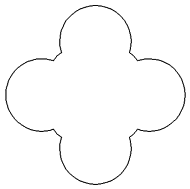
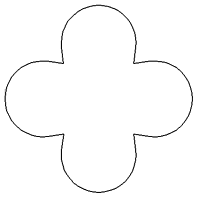
Original Vector
Vector with Fillets
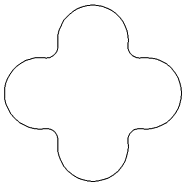
New Vector after Removing Fillet
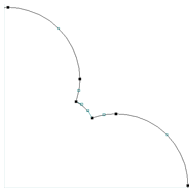
Original Vector in Node Edit Mode
Vector with Fillets in Node Edit Mode
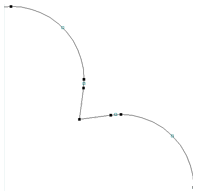
New Vector after Removing Fillet
in Node Edit Mode