
What's New in Cut2D Laser Desktop 9.5
Welcome to Cut2D Laser Desktop V9!
This documentation provides a convenient guide for previous Cut2D Laser Desktop customers to highlight new and enhanced features specific to this release of the software. It is intended as a way for existing Cut2D Laser Desktop users to locate just the new or changed aspects of the software.
If you are new to Cut2D Laser Desktop, don't forget that full documentation of all the features of the software can be found here , or by selecting Help ► Help Contents from the Main Menu on Cut2D Laser Desktop's main window.
New Drawing Tools
This latest version of Cut2D Laser Desktop introduces several entirely new drawing tools and features,
Smart Snapping
The way you draw in the software has seen some huge improvements making it quicker and easier to create and align geometry in the software with the introduction of Smart Snapping. Smart Snapping can dramatically reduce the time taken to create vector geometry. It enables geometry to be snapped to lines, extensions and intersections which don't exist as geometry thereby reducing the need for most construction vectors.
Quick Keys
In addition to the Smart Snapping feature we have introduced the ability to transform and create shapes using Quick Keys. This allows you to add more precision to your shape creation and editing process more easily by allowing typed values while creating geometry. This is supported for creation of circles, ellipses, rectangles, polygons, stars, polylines and in editing nodes or transforming vectors.
Pressing the Space-bar re-opens the last vector creation form you used. This is very useful when using other forms in between each shape / text / dimension you create.
Vector Validator
The Vector Validator is intended to help locate issues with contours after importing vector files to look for problematic issues that could potentially affect toolpath creation such as overlapping contours or intersections. It also indicates zero-length spans that are in the file, where the software can fix them at the click of a button.
Enhanced & Extended Drawing Tools
This section details the improvements that have been made to features you will already be familiar with from earlier versions of Cut2D Laser Desktop and includes the following:
- Text Editing (V9.5)
- Picture Editing & Cropping (V9.5)
- Dimensioning
- All Closed Shape creation tools are now fully consistent
- Create tangents lines to circles & arcs using the Polyline Tool
Text-Editing (V9.5)
 The
Create Text Form (V9.5)
The
Create Text Form (V9.5)
From version 9.5 any text is edited in-place including Arc Text and Text on a Curve, even if it has been moved, scaled and rotated. Custom kerning and spacing is also maintained where possible.
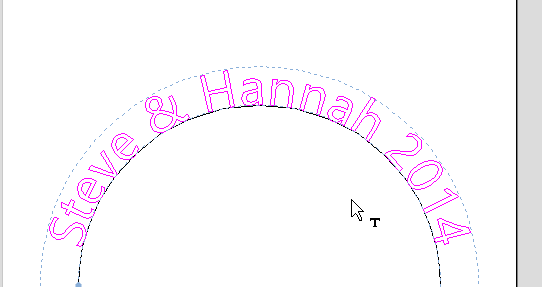 Editing text on a curve
The behaviour of the Create Text form has changed to provide more visual feedback about the changes you are about to make. If the form is opened with no selection, the new text is placed somewhere on the material (if possible) between the center of the material and the center of the view to help keep it visible. An empty box is drawn in the view which helps visualize the currently specified text height and anchor point.

Text height and position guide for empty text
Existing text has guide lines showing the height of the top line of text. Some fonts will descend below the lower line like handwriting on a note pad. Clicking selected text while editing, changes the anchor point to a box which can be dragged and dropped with snap.
The view is updated shortly after the user stops changing the form properties (e.g. mouse-wheel scrolling through the font list) providing a live update of your edited or created text.
 Arc Text (V9.5)
The arc sector is now drawn when editing and provides a handle at the center of the arc which can be used to move the text. The text and font properties of Arc Text can be edited using the Create Text Form whilst still keeping the text on the arc.
Picture Editing & Cropping(V9.5)
 The
Edit Picture Form (V9.5)
The
Edit Picture Form (V9.5)
The Edit Picture form allows you to adjust the visual properties of a selected bitmap. You can adjust the contrast, brightness and gamma of any selected image. Borders of different sizes and radii can be added to bitmaps. Bitmaps can also be made black and white.
 Rectangular Border
 Oval Border
 The
Crop Bitmap Tool (V9.5)
The
Crop Bitmap Tool (V9.5)
The Crop Bitmap tool can be used to select the parts of an image you are interested in, and remove the parts you are not.

 Dimensioning
Further improvements have been made to the way you can create dimensions in the software. It has been enhanced to allow faster placement and more freedom. You now have the option to edit existing dimensions while the form is open. Dimensions can now have custom text. This text is stored per dimension, so you change between calculated and custom text without losing a dimension's custom text.
Shape Creation
Improvements have been made to the way we create shapes. If a shape is selected when a shape's form is opened, the form will load its values from the selected shape, otherwise it holds the same values it had when it was last closed.
When drawing a shape, the size of the shape you are drawing will be displayed, changing appropriately for the snap radius and job size. You can now edit a shape whilst in the shape form.
Creating Tangent Lines
Using the keyboard shortcut T in the Polyline Tool, you can create a tangent to and from existing arc spans or circles.
Extending A Polyline (V9.5)
There are two new ways to extend an existing polyline:
- Open the polyline tool. With ctrl held down select the end point of contour you wish to extend.
- In node editing mode select the end point of the polyline you wish to edit. Then use the right-click Menu to select Edit Polyline. This will open up the Polyline Form with the selected polyline now being extended.
Smoother Joining (V9.5)

Version 9.5 of Cut2D Laser Desktop upgrades the 'Join vectors with smooth Curve' method with an alternative joining algorithm which produces smoother results. Select either one or two open vectors and click the button.
 Example of new smoother joining (left) versus old joining (right)
If you want to access the old joining method then hold the Ctrl button down to use the older join method. The Smooth Join Vectors option can be used to choose which method is the primary join method and which method is the alternative join method and hence requires Ctrl to access
Bitmap Background (V9.5)
It is now possible to choose a bitmap to be a background image for your 3D view. This image can be set by setting Edit ► Options ► Shaded Background Style to be Image and specifying the image path in Edit ► Options ► Image File Path
General Improvements
Two-Sided Job Support
Major changes have been made throughout the software to support jobs which require you to machine both sides of your material. Cut2D Laser Desktop now helps you to manage and organize your drawings, models and toolpaths for each side of your part using simple controls. The software helps with correct alignment of your vectors and toolpaths and even provides a full 3D preview of your part as it will look when cut from both sides. For lots more information please see the new Two-Sided Machining section of the full documentation.
View Toolbar

A new View Toolbar is displayed above the view window, which allows easier access to common tools. With the ability to create a double sided project you have easy access to switch between the Top and Bottom Sides of your project. The Layers Drop down bar has now moved from the drawing tab to the View Toolbar, making it accessible at all times. The other icons displayed in order of left to right are as follows:
Snapping Toggle Options
 Snap to geometry
 Smart Snapping
  Snap to Grid
 View Controls
-
 Toggle Pan / Twiddle View
 -
 Zoom to box
 -
 Zoom to drawing
 -
 Zoom to selection
Toolpath Drawing Toggle
-
 Toggle 2D Toolpath Drawing
 -
 Toggle solid 2D Toolpath Drawing
There are also additional tools available when you are working on a two-sided job. For more information, please see the Toolbar section of the documentation.
Export to PDF
You can now export your drawings to PDF. This is a useful and standard format but it also enables you to print your drawings to scale on a suitable printer using Adobe or other 3rd party PDF software.