Smooth Components

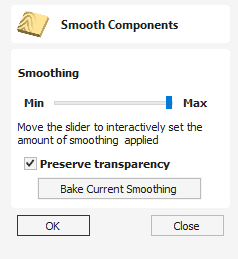
Often it is advantageous to apply a general smoothing effect over the whole of a component (rather than smooth a particular area with the Sculpting Tools). To use this tool, select the components you wish to smooth and then click the Apply smoothing filter to selected components icon on the Modeling tab. The form will appear and VCarve Desktop will take a few seconds to prepare the model for the smoothing operation. You will see a progress bar at the bottom of the screen while it is doing this.
One or more Components can be selected for Smoothing. If you select multiple shapes or a Component Group then the software will need to Bake your selection into a single Component, if applicable you should ensure you have a safe copy of your current Components before proceeding.
If you wish to smooth individual components one after another, potentially with different amounts of smoothing, you can do this by selecting one component, apply a suitable smooth filter value with the slider and then hit the Bake Current Smoothing button in the form and then proceed to selecting the next component you wish to smooth. When pick a new Component the software may take a few seconds to pick it and apply the smoothing filter to it at the default of 50% strength. If you do not click on the button before you select a new component then the effects of the smoothing will be lost on the previously selected component.
Note
Smoothing should be performed with both the 2D and 3D View visible (Tile Windows), so you can easily see the selected Component in the 2D View and also view the effects of the smoothing in real time on the 3D model in the 3D View.
 Smoothing
This slider will allow the user to control the strength of the smoothing applied to the Component. By default 50% smoothing is applied, using the slider different levels of smoothing can be applied to the model. Find the strength which gives you the amount of smoothing you require. If the Max setting has not smoothed the model enough then hit the Bake Current Smoothing button which resets the smoothing slider to allow you to do further smoothing.
 Preserve Transparency
Checking ✓ this option will keep the smoothing only on the current 3D areas of the selected shapes and not smooth the edges into the background. Un-checking this option will smooth all the edges of the modeled area into the background of the part, blurring the silhouette of the Component.