V-Carve Toolpath

This icon opens the V-Carving Toolpath form which is used to specify the type of carving required, details, cutting parameters and name for the toolpath.
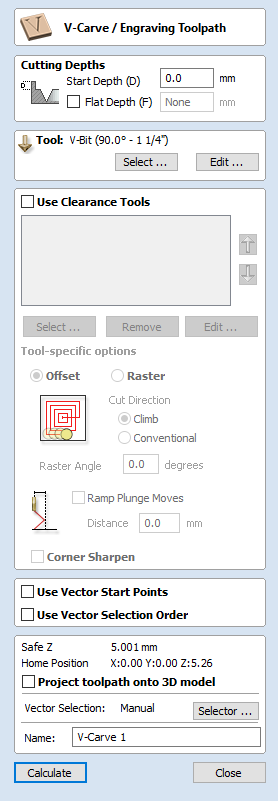
 Cutting Depths
Start Depth (D) specifies the depth at which the V-Carving toolpath is calculated, allowing V-Carving / Engraving to be machined inside a pocket region. When cutting directly into the surface of a job the Start Depth will usually be 0.0. If the V-Carving / engraving is going to be machined into the bottom of a pocket or stepped region, the depth of the pocket / step must be entered. For example, to carve or engrave into the bottom of a 0.5 inch deep pocket, the Start Depth = 0.5 inches
 Start Depth (D)
Start Depth (D) specifies the depth at which the V-Carving toolpath is calculated, allowing V-Carving / Engraving to be machined inside a pocket region. When cutting directly into the surface of a job the Start Depth will usually be 0.0. If the V-Carving / engraving is going to be machined into the bottom of a pocket or stepped region, the depth of the pocket / step must be entered. For example, to carve or engrave into the bottom of a 0.5 inch deep pocket, the Start Depth = 0.5 inches
 Flat Depth (F)
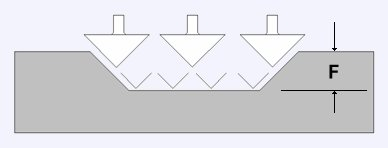
Checking ✓ this option limits the depth that the tool(s) will machine to, and is used for Flat Bottomed Carving and Engraving.
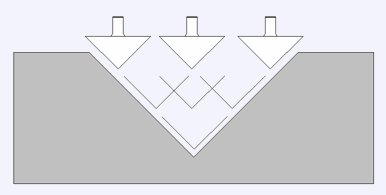
When No Flat Depth is specified the toolpath will be calculated to carve or engrave to full depth as shown below. Multiple z level passes will be automatically calculated where the tool needs to cut deeper than its Pass Depth specified in the Tool Database
No Flat Depth

Flat Depth

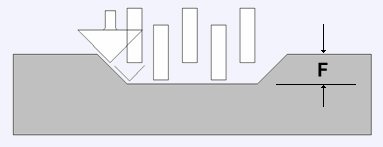
Flat Depth Using 2 Tools

 Tool
Tool
Clicking the button opens the Tool Database from which the required V-Carving or Engraving Tool can be selected. See the section on the Tool Database for more information on this.
Clicking the button opens the Edit Tool form which allows the cutting parameters for the selected tool to be modified, without changing the master information in the database. Note that Ball Nose tools can also be used to V-Carve designs.
 Use Clearance Tools
Check ✓ this option if you wish to use End Mill, Ball Nose or Engraving cutters to machine the large open regions of a design. If no tool is selected here but Flat Depth is specified then the selected V-Carving tool will be used to clear the flat areas as well as for the V-Carving. All the tools in this section will leave an allowance for the V-Carving tool. Subject to this, the first tool in the list will remove as much material as it can, whereas subsequent tools will only machine areas the previous tools could not fit. The order of the tools in the list should match the order they will be run on the machine.
Clicking the button opens the Tool Database from which the required clearance tool can be selected and added to the list.
Clicking the button will remove the selected tool from the list.
Clicking the button opens the Edit Tool form which allows the cutting parameters for the selected tool to be modified, without changing the master information in the database.
Clicking the up and down arrow buttons will move the selected tool up and down the list respectively.
 Clearance Tool Options
The strategy used to clear the material, either Offset or Raster, can be chosen for the first clearance toolpath. In the case of Raster, a Raster Angle can be entered.
The cutting direction, either Climb or Conventional, can be selected for each clearance tool.
Checking ✓ Ramp Plunge Moves applies ramping to the plunge moves of the first clearance toolpath.
The above options are the same as those found on the Pocketing form.
Checking ✓ Corner Sharpen will raise the selected Engraving tool to fit the smaller tool tip into narrower regions. This option is available for a tool positioned second or later in the list.