Layers
Vectors, Bitmaps and Component Grayscale's can be assigned to different layers. All the objects assigned to a layer can then be simultaneously selected, labeled, colored, temporarily hidden or even locked (to prevent accidental editing) using the Layer Management tools. Even for relatively simple designs, organizing the elements of your artwork onto layers can make managing your project much easier.
There are no specific 'rules' on how to use the layers -there are many ways to organize your design and these are likely to vary between individuals and even between different jobs. The 'meaning', therefore, of the layer organization in any particular project is entirely flexible. Some common examples of layers include:
- Organizing artwork according to the toolpath strategies to be created.
- One layer for shapes to be profiled, one for those to be pocketed, one for drilling etc.
- Coloring different parts of the design to reflect different parts of the finished piece.
- Hiding or locking geometry used as guides or temporary stages in the construction of the final design.
Layers can be particularly useful to organize the Grayscale Previews of 3D Components. Because 3D Components are often positioned on top of one another (to build up the required 3D shape), it can become awkward to see or select components that are underneath others. Component grayscale Previews can be placed on layers and hidden temporarily while the design is built.
Managing Layers
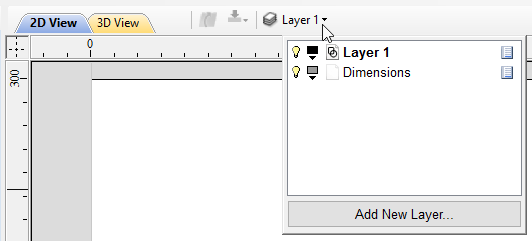
You can access the tools needed to manage layers from two locations: the Layer Control on the View Tool Bar, and the Layer List on the Layers tab.
The Layer Control on the View Toolbar
A Quick Access Layer Control is conveniently located above the Views in the View Toolbar. This tool provides a pop-up Layer List, from which you can quickly change the selection of the active layer, add a new layer, or modify the properties of any existing layer. When you have finished, click anywhere outside of the Layer List window and it will cause it to close.
The Layers Tab
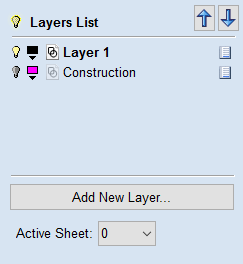
To get a complete overview of the current layer structure of your artwork while you are working, or to carry out more extensive organization of the layers, you can also use the Layers tab. The Layer List is identical in both the Layer Control and the Layers tab, but the latter can control layer ordering and be left visible, pinned or even undocked, while you continue to work on the artwork itself.
The Layers Tab makes it very easy to work with complex designs giving quick access to all of the layer control options.
From this tab you view all the layers in your current job and modify their properties (such as visibility and color). You can also create, delete, re-order or rename them.
Most of the commands associated with layers can be accessed by right-clicking a layer in the list, or by clicking on the Pop-Up Menu icon  to the right of the layer name.
List Item Command and Icons
Each layer in the list has five elements:

Status Icon
The leftmost icon indicates whether the layer is currently  visible or
  hidden.
Click on this icon to toggle the visibility of the layer.
hidden.
Click on this icon to toggle the visibility of the layer.
The presence of a padlock  shows that the layer is locked and cannot be accidentally edited.
 Right-click the layer in the list and select the Unlock command to alter this.
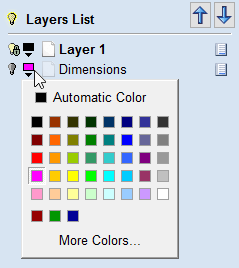
Layer Color
The color swatch can be used to color all the vectors on a layer.
Click on the swatch icon  and select a pre-set color from the color selector dialog, or choose to create an entirely custom color.
Layer Content
The layer content icon will be grayed-out as an additional indicator that the layer is not currently visible.
 a blank white sheet indicates that the layer does not currently contain any objects or vector geometry.
If you import files from 3rd party CAD drawing packages via DXF or DWG format it is common for the file to include empty layers.
This icon allows you to identify these empty layers and delete them.
a blank white sheet indicates that the layer does not currently contain any objects or vector geometry.
If you import files from 3rd party CAD drawing packages via DXF or DWG format it is common for the file to include empty layers.
This icon allows you to identify these empty layers and delete them.
then use any layer's Pop-Up Menu icon
to select the Merge Visible command.All the visible layers will now be merged into a single layer, which can be deleted with a single operation.
Layer Name
To change the name of a layer, you can double click on this part of the layer item in the list to trigger in-situ editing. This works in the same way as file renaming in Windows Explorer. Alternatively you can right-click or use the layer's Pop-Up Menu icon to select the Rename command.
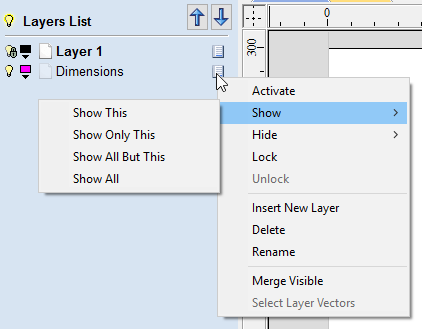
Pop-up Menu
Click the pop-up menu icon for access to Activate, Lock, Insert, Delete and Merge layers as well as further ways to choose which layers to show and hide.
Additional Buttons and Icons
Show All / Hide All
The visibility icon to the left of the Layers List heading at the top of the Layers Tab will toggle the visibility of all the layers in the list.
If there are both hidden and shown layers, this icon is shown as a dim lamp: 
Clicking the dim lamp will show all layers and change to icon to a lit lamp: 
Clicking the lit lamp will hide all layers and change to icon to an off lamp: 
More options for setting the visibility of multiple items are available from the Pop-Up Menu for each layer under the Show and Hide menu headings.
Select All on a Layer
Double-clicking on a layer in the Layers List will select all the objects on that layer. Alternatively you can choose the Select Layer Vectors command from the layer's pop-up menu.
Layer Ordering Arrows
Adjacent to the Layers List heading label are two arrow buttons. These move the selected layer up or down in the Layers List. This can be important to set the drawing order of objects that might otherwise obscure one another (specifically Bitmaps and 2D Component Previews). Objects on the top layers in the list are always drawn before objects in the lower layers and will, therefore, be 'underneath' them in the 2D View. You can use the Layer Ordering Arrows to resolve this issue.
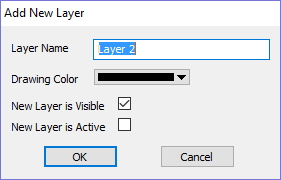
Add New Layer
New Layers can be added using the button.
Alternatively a new layer can be created directly from the 2D View by right-clicking an object and selecting either the Copy to Layer ► New Layer... or Move to Layer ► New Layer...
The dialog for adding the new layer is displayed with options to specify the name and color of the vectors on the new layer and an option to indicate if the new layer should be visible.
Layer Name
It is always preferable to take the opportunity at this stage to give your new layer a meaningful name relating to its content or purpose. Later on this name will make it easier for you to manage your layers as your design becomes more complicated.
Drawing Color
All the vectors on this layer will be colored according to this setting. This can be a very useful way of distinguishing between the vectors that are on different layers, directly in the 2D View.
New Layer is Visible
With this option checked, ✓ the new layer will automatically be visible as soon as it is created.
New Layer is Active
With this option checked, ✓ the new layer will automatically become the active layer and any subsequent vector creation or manipulation will occur on this new layer.
Insert New Layer
An even quicker way to add new layers is via the Insert Layer command from a layer's right-click Pop-Up Menu. This command will create a new layer above the selected layer which will be visible, unlocked and colored black. After creation the new layer item's name is ready to be immediately edited by typing a new name in.
Moving Layers
Objects on any layer can be moved onto another layer by right-clicking the object in the 2D View and selecting Move to Layer ► ... from the pop-up menu.