How to Get Started
The first stage in any project is to create a new blank part or import some existing data to work with. At this stage a number of parameters need to be defined relating to the size of the part and its position relative to the datum location on the CNC machine. Later, once the part has been defined and you have started working, you may want to change the size of the material, import additional data and generally manage the project operation. In this section of the manual the initial creation of a part will be covered along with all the icons which appear under the File Operations section of the Drawing Tab.
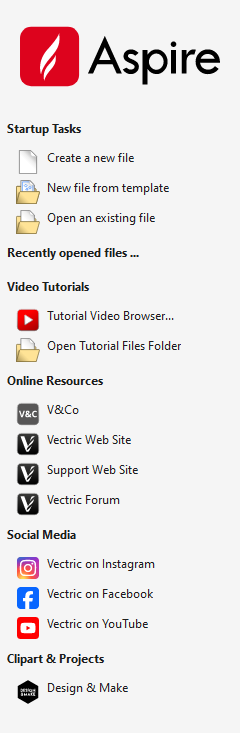
When you first start the program you will see the Startup Task options on the left hand tab and also a list of your 4 most recently opened Cut2D Desktop parts (this is a rolling list that will be populated each time you run the software and may initially be empty).
Startup Tasks and Recently Opened Files
When you first start the program you will see the Startup Task options on the left hand tab and also a list of your most recently opened Cut2D Desktop parts.
In the Startup Tasks section you will have the option to Create a new file, New file from template or Open an existing file.
Creating a new file allows you to specify a size and location for a blank work area, set your material thickness and also set the model quality and even the shading color/material. The process to do this will be covered in the next section (Job Setup Form Options).
New file from template will allow you to start a project using a pre-created template file from your computer. The CRVT3D or CRVT template files will have the necessary information for material size etc. already embedded in it. It may also contain vectors and toolpaths that have been created for this template file. Template file are created for settings you use regularly so you do not need to create them each time.
Open an Existing File, will allow you to open a pre-created file from your computer. This may be a file you previously created (*.crv3d or .crv). Alternatively, it might be a 2D vector layout from another CAD system (.dxf, *.eps, *.ai and *.pdf). A CRV3D or CRV file will have the necessary information for material size etc. already embedded in it. The 2D formats will import the data at the size and position it was created but will require you to go through the Job Setup form to verify/edit all the parameters for the part.
Video Tutorials
The Tutorial Video Browser will open your default web browser (typically Mircosoft Edge, Chrome or Firefox - depending on your Windows setup and personal preference). The web browser offers a number of tutorial videos and associated files, presented either by project or feature category to help you to learn about the software. You will initially need internet access to watch or download the videos or files, but, once downloaded, the materials can be used offline.
Online Resources
This section includes direct links to useful websites and web resources like the Vectric website, V&Co portal and forum. These links will also open in your default web browser and you will need internet access to use them.
Social Media
This section includes direct links to the Vectric social media accounts - here you can find the latest news about the software, free projects, Tips and Tricks and events. These links will also open in your default web browser and you will need internet access to use them.
Clipart and Projects
This section includes a direct link to the Design and Make website where you can purchase and download additional clipart. This link will also open in your default web browser and you will need internet access to use them.