Dimensions
This tool allows you to add a variety of dimensioning annotations to your vector drawing.
Creating Dimensions
Unless otherwise noted below, dimensions are created by following these steps:
- Select the dimension type you wish to need: length; height; width; angle or the radius or diameter of an arc.
- In the 2D View, click with the left mouse button to set the points the dimension needs:
For an Angle Dimension, the first point is the centre-point. - Click where you need the arrow-tips to be.
- Click to set the location of the dimension-line.
- Click to set where the annotation text will appear.
Editing Existing Dimensions
To edit an existing dimension while the form is open, hold down aShiftkey while selecting it.
Dimension Types
The dimension tool supports a number of different dimension types.
Length Dimension
Use this to dimension a straight-line length in any orientation between two points.
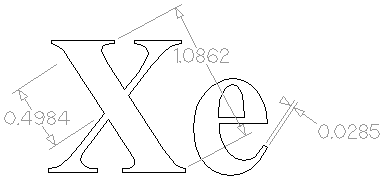
The text preview box will snap to to the middle of the dimension line, unless a Shift key is held down while dragging.
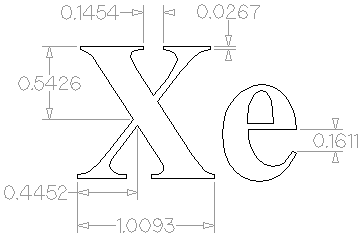
Vertical / Horizontal Dimension
These two options also allow you to select any two points, but the resulting dimension will be locked to indicate a vertical or horizontal distance (respectively) between the two points.
The text preview box will snap to the middle of the dimension line, unless a Shift key is held down while dragging.
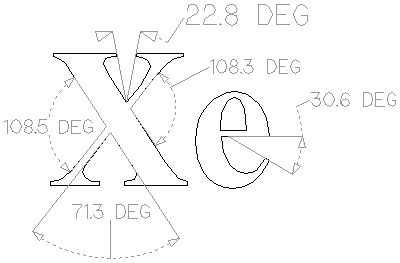
Angle Dimension
This option allows any arbitrary angle to be measured. The process is similar to creating a 3 point arc. First you must pick the center of an angle you wish to measure - typically a corner point. The next 2 points clicked will set the extents of the sweep you are measuring. The next Click will determine the dashed dimension line positioning and the final click will set the position of the text annotation.
- Angle Dimensions' arrow-heads will pop outside small angles if there is not room to draw them inside.
- Angles are extended with a dashed extension-line where required, allowing the dimension to be placed anywhere. The text snaps to the angle center and the leader-line angle snaps to horizontal, vertical or diagonal (disable snapping by holding down aShift key).
- Angle Dimensions use a separate Decimal Places value to the other dimensions (as you change dimension-type you may notice the Decimal Places value change).
- Angle dimensions can now have up to six decimal places.
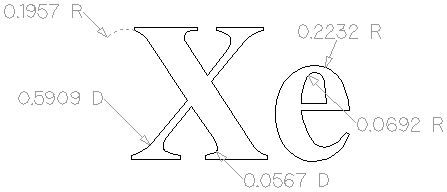
Arc Dimension
With this option selected you will only be able to select arc spans with the first click of dimension tool (Bezier curve spans are not supported). The second click will set the position of the dimension annotation, which will show the radius (or diameter) of the selected arc span.
- To display the diameter of an arc dimension simply check ✓ the Show Diameter box.
- Arc Dimensions recognise when a circle has been selected and allow placement anywhere around the circle. Arcs will now be extended with a dashed extension-line where required, allowing the dimension to be placed anywhere. The text snaps to the arc/circle center and the leader-line angle snaps to horizontal, vertical or diagonal (disable snapping by holding down a Shift key).
Note
Circles or arcs that are polygonized (from an imported file or from the Curve fit vectors command using Straight lines) are not recognized and cannot be dimensioned with this tool
Font Selection and Settings
This section of the form allows the user to change the settings for the dimension annotation, such as the font to be used, the height of the text and how many decimal places are required. The Offset field determines the gap left between the dimension markers and the vectors that are being measured.
Use Custom Text
You can check ✓ Use Custom Text to insert your own custom text. The text is stored per dimension, so you change between calculated and custom text without losing a dimension's custom text. When the form is first opened it defaults to calculated text.
Place Dimensions on Layer
By default this option is checked ✓ and the dimensions will be placed on a mid-gray Dimensions Layer. You can edit the name of the layer in the Name edit field. If a layer of this name does not exist, it will be created automatically.
Note
Dimensions can be edited. Hold shift while selecting the dimension you wish to edit or use the Undo shortcut Ctrl+Z to undo previously created Dimensions while still in the Dimensioning tool.