VTransfer
VTransfer is a small helper application provided by Vectric to simplify the process of sending toolpaths to some Grbl-based controllers. You should run VTransfer on the PC which your CNC machine is connected to via a USB serial connection.
If your Vectric CADCAM software is also running on the same PC, you can use Direct Output mode to send toolpaths to VTransfer directly from the Toolpath Saving form, without the need for file saving or loading.
VTransfer also provides the commands you need to initiate basic homing, jogging and setting of origins on your CNC machine before a toolpath is run.
Controllers
VTransfer has been created specifically for streaming toolpaths to a pre-configured controller. It expects that your controller is correctly set-up and tested for your hardware. VTransfer will not set, alter or validate your controller's parameters in any way and is not intended to be used for lower-level controller configuration.
 Getting Started
Before starting VTransfer, you need to ensure that your machine is powered on, any required drivers are already installed and the machine is accessible via a serial port (COM port on Windows). For most machines connected by USB, you will need to have installed the appropriate device driver for your machine controller. These drivers will be provided by your machine tool supplier and you should verify that your CNC machine connects correctly to your PC before attempting to use VTransfer.
When the machine and drivers have been installed correctly, refreshing and checking the drop-down Connect On: list will show your machine tool controller. VTransfer will still need to know the specific communication protocol required though and the first time you use VTransfer you will need to complete some one-time set-up and configuration.
Once set-up for a machine that remains connected to the same USB port of your PC, VTransfer should automatically detect and connect each time it starts-up.
Initial Set-up
Once this initial set-up has been completed, VTransfer should automatically detect and connect to your machine on start-up, provided the machine remains connected to the same USB port of your PC. Before connecting to your machine for the first time, however, you should complete the following steps to set the right controller type and maching configuration.
- Select File->Settings from the main menu to open the Settings
- Make sure that your controller is selected in the Controller Name: drop down list (for a Grbl version 1.x controller this will be Grbl, for example)
- Select the correct configuration file for you machine, or create your own.
Controller Connection
- Make sure that your machine is connected to the PC via USB and it is powered on
- Click the button, regenerate the Connect On: drop down list with all of the detected devices connected to your PC.
- Select your controller device from the list - note that this may be the name of the microcontroller on which your controller is running, rather than the controller name itself (grbl may appear as Arduino UNO, for example)
- Check that the Machine Status reported by VTransfer reads Looking for... followed by the expected controller name
- Machine Status will change to Connecting while VTransfer attempts to verify the controller is communicating as expected
- Once correct communication has been established the Machine Status will change to Initialising, Alarm or Ready depending on how your machine is configured
Running a toolpath
Once connected to your CNC machine, the typical steps for running your first toolpath using VTransfer are:
- Open the Jog Tab
- If your Machine Status is Locked, either or Unlock your machine (if supported and configured)
- Load your toolpath file or send one to VTransfer via Direct Output
- If required, jog the machine to the location of the material on your CNC machine (to match the relative origin point of your toolpath) and set the
- Fit the required tool
- Either run the Z Touch Plate cycle (if supported) to set Z Zero to match your toolpath
- Or manually jog the tip of the tool to the material surface or machine bed (again to match the Z Zero setting of your toolpath) and set the
- Ensure the spindle is on (if it is not controlled automatically)
- Open the Cut Tab - Click
Sending a toolpath directly to VTransfer from your Vectric software
At the point of saving your toolpath some post-processors support the option of Direct Output to VTransfer (such as the Emblaser or X-Carve). If you have one of these post-processors selected, the Output direct to machine checkbox will be enabled below the post-processor selection box in the Toolpath Saving form.
With this box checked, will change to and clicking this button will automatically send the toolpath to VTransfer. If VTransfer is not already running, it will launch automatically.
Whenever a new toolpath is loaded or received by VTransfer it will prompt you with a message box.
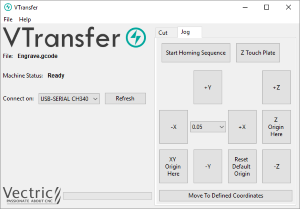
Homing, Jogging and Origins
Before running your toolpath, it is essential to set your machine's origins appropriately. The specific process you need to use will, to a large extent, will be determined by your machine and its configuration. Generally you will need to home your machine (if supported) and set the X Y origin to match the intendended toolpath and location of the material on your machine's bed. You will also need to fit the correct tool and typically set the tip of this tool to be at Z Zero, either at the top or bottom of your material - again this choice will already have been determined when your toolpath was created. The commands relating to these actions are all available from the Jog tab.
Whenever VTransfer changes its origin settings you will be prompted with a message box.
Start Homing Sequence
Click this button to initiate the homing sequence. The homing sequence will culminate in setting the origins of your machine using its homing switch locations and the machine's machineable area - both of which are set in the configuration. For some controllers (such as Grbl) you will typically be required to run this command before you can do anything else because the machine will start-up in a disabled Alarm status.
Note
This button is only available if your machine is configured with homing switches and homing is enabled.
Z Touch Plate
This button will be visible if your machine is configured with a touch plate, touch plate support is enabled and its thickness is set in the configuration settings. Click it to initiate the Z touch plate probing cycle. Make sure that the touch plate is in position and correctly functioning before clicking this option as it will immediate begin a plunge move.
Warning
Make sure that the touch plate is in position and correctly functioning before clicking this option as it will immediately begin a probing plunge move.
Jogging
The , , , , and buttons will each jog the machine along the Y, X or Z axes, respectively.
The distance moved by each button click is determined by the current value (in mms) shown in the drown-down control at the center of the jogging buttons. Ensure that you adjust this value appropriately before using the jog buttons to move the machine.
Lasers
If the selected configuration for your machine has a Z travel value of zero, this indicates that the machine does not have a Z axis - this is the case for most laser cutters - and Z axis controls will not be visible.
Setting and Resetting Origins
By default a machine with homing support will have its X Y origin (the postion of the coordinate X:0 and Y:0) set to the bottom left corner of machine's machinable area following a homing cycle - i.e. the machine will operate in a positive coordinate work space within its machinable area. For machines without homing support, the initial X Y origin must alwaysbe set manually before running a toolpath. In additon, when a toolpath is created it is very common that the X Y origin will actually be chosen to be relative to the material (not the machine bed) - for example, the center of a design may be used. For most toolpaths, therefore, you will need to jog the machine to the matching origin location for the toolpath (relative to your material), and manually before cutting.
For machines with homing support, you can restore the bottom left corner origin after setting it for a specific toolpath by clicking at any time. When this button is clicked the location of coordinate position X:0, Y:0 will once again be set to the bottom left corner of the machine's machinable area.
Running the Toolpath
The Cut tab contains the controls need to begin cutting your toolpath and monitoring its progress.
Cut Now
When your machine is correctly set-up (with the X,Y and Z origins set), click this button to begin streaming the toolpath to your machine and begin cutting.
Warning
Make sure your machine spindle is on before clicking this button if your spindle control is manual.
Estimated Time Remaining
Once your toolpath has started, VTransfer will provide a dynamic estimate of the remaining time until the toolpath is finished.
Dynamic Feedrate Override
If your machine supports feedrate override control and the option is enabled in your configuration, then the and buttons will be available. Click these buttons to increase or decrease the current toolpath feedrate by 10%. The current state of the feedrate override setting is indicated by the percentage value between the two control buttons.
Delay
Depending on the nature of the toolpath you are running, there may be a delay of one or more seconds before your machine responds to the feedrate change so allow for this when using these controls.
Abort
This button will stop the toolpath as quickly as possible, usually resetting the controller in the process. Once a toolpath has been aborted you should re-home and re-origin before running a subsequent toolpath.